Assigning a Domain to Your Pressable Site
This guide will show you how to point your domain to Pressable’s servers and add the domain to your Pressable-hosted site. If you don’t already own the domain you want to use, you will want to purchase one through a domain registrar. Some of the most popular registrars are GoDaddy.com, Namecheap.com, Name.com, and Gandi.net, just to name a few.
Domain Setup Wizard
Important: Pressable has a Domain Setup Wizard option, which makes connecting your domain to your Pressable site a breeze! Check to see if the Domain Setup Wizard will work with your registrar and learn more here.
Manual Domain Setup
Manually assigning, sometimes referred to as adding or pointing, a domain to a Pressable site is a two-step process.
- Step one is pointing your domain to our servers. This can be done by using Pressable’s Nameservers or by pointing your A records to Pressable’s IP addresses.
- Step two is adding your domain to your Pressable site within the my.pressable.com Control panel.
Step One: Setting Things up at Your Registrar
There are two methods of completing step one. Once you have a domain, use one of the following methods to point your domain to our servers through your registrar’s control panel. We recommend the easy Name Server method.
Name Server Method
Configure your domain’s Nameserver settings to use Pressable’s:
- ns1.openhostingservice.com
- ns2.openhostingservice.com
- ns3.openhostingservice.com
- ns4.openhostingservice.com
- ns5.openhostingservice.com
Not sure how to complete these steps? Click the name of your registrar below to find the step-by-step instructions on how to change your nameservers. If your registrar is not listed, contact them directly.
GoDaddy NameCheap GoogleDomains WordPress.com Name.com Gandi.net
Note: that if you already have email hosting for your domain, we recommend using the A Record Method. Alternatively, if you’d like to manage DNS at Pressable and point the NS, please get in touch with us prior to changing the name servers to minimize/prevent any email downtime.
A Record Method
Enter A records in your custom DNS settings at your registrar if you control your own DNS. This option is primarily for advanced users. You will need to add the first IP address to the existing A record with @ host. Then create a second A record for the @ host and use the second IP address for it. This is known as a round-robin configuration and adds redundancy to your DNS. You can find the specific IP address for your Pressable site in the MyPressable control panel:
- Log in to MyPressable Control Panel
- Select the site you want to work on from your site list:

- Navigate to the “Domains” in the menu.
- Under “IP Addresses” in the Domains section it will show the complete IP addresses that you must enter as A records at your registrar. Note that the image below is an example only.

- At your registrar, add the A records for both the www and root (@/non-www) versions of your domain. You will have 4 A records total for a round-robin configuration. This helps ensure that your site is always available for users.


Adding the DNS A records
Most DNS hosts allow you to add multiple IP addresses. For example, if your DNS host is GoDaddy, your domain’s records may look something like this now:

In this case, assuming the new IP addresses are 199.16.172.147 and 199.16.173.41 (for example), take the following steps:
1) Modify the existing A record pointing to 209.15.20.206, to 199.16.172.147

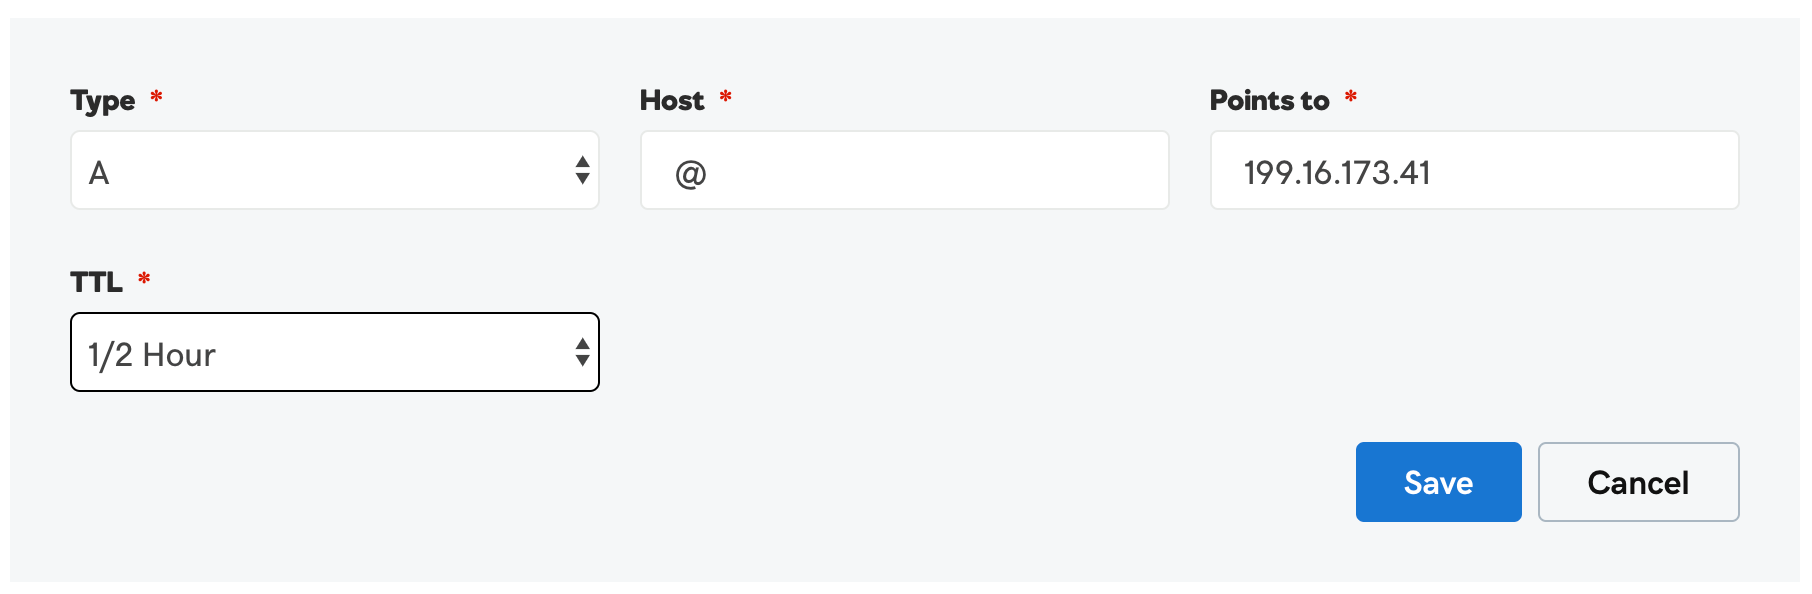
2) Click “Add”, and create another record where your host is “@”, your IP is “199.16.173.41”, and TTL (time to live) is “1/2 Hour”:
3) Once saved, your records should look like this:

In some cases, the “www” record may be a separate A record, and not a CNAME record. In other words, rather than having “@” as its value, it will have an IP address; in our example, 199.16.172.147.
In this case, you can either remove the “www” record and create a CNAME (as above), or you can change the IP address and add a new one, similarly to what was done for the “@” record above. It may look something like this:

My DNS host does not allow me to add two A records. What should I do?
Some customers have informed us that their DNS hosts do not allow them to add multiple records with the same IP address. If you run into this issue, you may use one IP address, but this is not ideal. If possible, we’d encourage you to verify that you are unable to implement multiple records for the same IP address with your DNS host or use a different DNS host.
Step Two: Add Your Domain at Pressable
After you have updated the DNS settings at your registrar, visit your MyPressable Control Panel. After clicking your site’s name navigate to the Domains > Add Domain link. In the Domains section, enter the non-www version of your domain name, in the text area and click Add Domain (we will automatically add the www version).

Once the domain has been added, it will begin provisioning the domain, DNS, and SSL which can be observed with the 3 icons next to the domain. You can hover over these icons for additional information. The icons will turn green when provisioning has completed successfully.
If you would like to change the primary domain, you can click the ★ button next to the domain that you would like to be the primary. All other domains will redirect to the primary.
In the example below, visitors of example.com will be taken seamlessly to the www version (www.example.com) instead of the non-www version.
You now have your custom domain pointed to your Pressable website. It may take up to 72 hours for the the DNS to propagate, however in most cases this process will take less than an hour.
Subdomains
Subdomains (ex: subdomain.example.com) are added in the same way, as they need to be created with the Domain Registrar, then pointed to Pressable using the Name Server Method or A Record Method listed above.
Internationalized Domain Names & Special Characters
Internationalized Domain Names (IDN) with special or accented characters must be added using a type of encoding called Punycode.
For example, the domain name
mañana.comwould be rendered asxn--maana-pta.comin punycode.
平仮名, ひらがなbecomesxn--, -473a2epb8i528txtiqrxin punycode.
You can convert to Punycode using PunyCoder or DNSChecker’s conversion tool.
Domain Health Statuses
When adding domains, Pressable includes a “Health” section that outlines whether the domain name is pointed and connected properly (green), or if there are issues (yellow). In this section, we will share what each of these statuses mean and how to address any issues that may arise.

Green (Healthy) Status
The green status means the domain is healthy and everything is set and working properly!
Yellow (Unhealthy) Status
The yellow status means that the domain is unhealthy or still provisioning.
We recommend checking the DNS status (especially if you just made the updates), to make sure that the Name Servers/A records are correctly propagated, and giving it a few minutes before checking the status. You can refresh the page after the DNS changes take effect to see if the status is updated to green (healthy).
If this status still shows yellow (unhealthy), then we can assume that something is not set properly. You can click ‘Actions ▼’ button to the right of the domain and click ‘Zone Info’.

The Zone Info page will display information outlining the problem, similar to the screenshot here. The possible causes and solutions are discussed below.

Possible causes include:
- “No DNS records found” -> This means that the domain is not pointed properly. Please review the Name Server Method and A Record Method instructions to correct the issue. If you’re sure the records are correct, please give the domain some time to propagate, then check the domain’s health again (after refreshing the page).
- “Failed getting DNS records” -> This means that the DNS records for the domain aren’t available. The most likely cause is that the domain hasn’t been purchased, has expired, or is not set up properly. Check with your domain registrar to make sure everything is set up properly there, and then please review the Name Server Method and A Record Method instructions to correctly point the domain to your Pressable site and re-add the domain to resolve the issue.
Other potential causes for an unhealthy domain status:
- The domain is removed from a Pressable site and was added to a different site too quickly – Atomic TXT records may be needed.
To speed up the process of validating the domain with the correct Pressable site when such a change is made, adding the Atomic TXT records will help.
- Domain is moved from WP.com – Atomic TXT records may be needed.
This indicates that the domain may have been added to a site on WordPress.com at some point, and due to our shared infrastructure with WordPress.com, you will need to enter two TXT records while changing the Nameservers/A Records for the domain to be correctly added to your Pressable site.
Adding Atomic TXT records:
To obtain these two TXT records, first add your domain to this Pressable installation. Then select the ‘Actions ▼’ button to the right of the domain and click ‘Manage Records’. Click on the copy icon on the TXT records to copy their values. Please note there is one TXT record for the www version of the domain, and one TXT record for the non-www version. Both TXT records need to be added.

After making any change to an unhealthy domain, please refresh the page and check to see if the status changes.
Step Three (Optional): Reprovision SSL Certificate
This step will only apply if you added your domain on the Pressable control panel (Step two) a considerable amount of time before pointing the domain via DNS (Step one). If this is the case, you may find that your site doesn’t have an SSL certificate and you will need to re-provision one. You can do that from the Domains link on your control panel.
Click the ‘Actions ▼’ button to the right of your domain and click ‘Retry SSL’. If you already have a valid SSL certificate you may see an error message, but if your site does not yet have a valid certificate this should generate one. You only need to click the icon once, we will include all secondary domains attached to the site in the certificate.
If you are still having trouble with SSL not working as expected please reference this resource for more SSL troubleshooting options.

With these steps complete, you should now have successfully configured and added your domain to a Pressable site.
Yoast Indexables
If Yoast (Yoast SEO or Yoast SEO Premium plugins) is used on a website and a domain is added or changed (new site, cloned site, etc) without taking steps afterward, it can result in the staging domain or previous domain showing in search results. Please follow the information here to ensure the proper domain is reflected within search results.


Learn more about our WordPress cloud platform