In today’s post, we’ll look at XML Yoast sitemaps and advanced settings.
XML Sitemaps
Having your site indexed by search engines is the first and most basic step of SEO. Search engines look for sitemaps in order to better understand your site’s structure. By creating a Yoast sitemap, you can improve the odds of your website being fully and successfully indexed. So let’s do it the right way.
General

It’s easy to set up a Yoast sitemap. To set up a sitemap, all you need to do is set the XML sitemap setting to Enabled. Yoast will automatically create a sitemap for your pages and posts. Once you’ve created a sitemap for your WordPress site, you’ll want to submit the sitemap.xml URL to Google Webmaster Tools. Doing this makes Google aware of your site and will get your site indexed as soon as possible.
Now let’s look at some of the options available in Yoast to configure your XML sitemap.
User Sitemap

If you want Google to index your posts by author, you should set this option to Enabled.
I prefer that my site’s search results don’t appear with author archives, so I set this option to Disabled.
Post Types

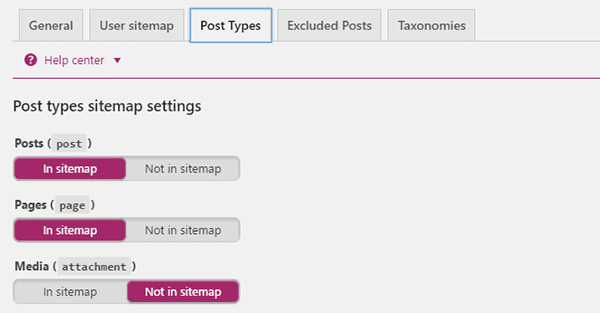
The Post Types options is the area where you can specify which post types will be included in your site’s sitemap. I like posts and pages to be included in the sitemap because I want search engines to understand the proper structure of these post types. I typically don’t want media files to be included in the sitemap.
Excluded Posts

Do you want to exclude some pages and posts from the sitemap file? That’s possible with Yoast. All you need to enter the post IDs of the posts that you want to exclude in a comma-separated string. Those posts will be excluded from the sitemap.
Please note that excluding pages or posts from the sitemap doesn’t guarantee that search engines will not index or rank them. If you want to exclude a post from being indexed and ranked, you’ll need to use the noindex nofollow setting when you create or edit the post. It can be found under the Yoast Plugin section of the WordPress editor.
Taxonomies

If you don’t want the categories and tags that you used in a blog post to be included in your site’s Yoast sitemap, choose the Not in sitemap option as I’ve done. This will give the Google bot fewer items to index.
Advanced Settings
You may have look at some advanced configuration options though you may not necessarily need to change these settings. Start by reading the description of each option and then decide if you need to modify the default setting.
Permalinks

There are three advanced settings that you may want to change here. I will describe each in detail.
Change URLs
If you configured the category base in WordPress and you would like to remove it, you can do so by choosing the option Remove.
If you haven’t created a category base, keep the default setting.
Redirect Attachment
You may have images in your posts or pages that, when clicked, open that image in a new page. Setting No redirect will eliminate these redirections. It’s worth choosing this option as there is no real point to having an image redirect to itself. This will ensure that anyone who clicks on the image from within Google search results will land on the specific page or post that contains the image.
Stop Words in Slug
The URL you prepare may contain stop words like to, for, from, a, or the. Those words might not be very important for the SEO URL slug. Leaving this option set to Remove will help you automatically remove those stopping words from your posts and pages’ URLs.
Conclusion
Yoast is a must-have plugin for anyone who’s new to SEO. The plugin comes pre-configured with some default options that fit most use cases but may not be a good fit for some users. By following the instructions in this guide, you’ll be able to set up Yoast with the best options for your site.

Darshan Joshi
Darshan is a founder of AlphansoTech, a WordPress development company. You can follow him on Twitter and connect with him on LinkedIn.


